A Step-By-Step Guide For Chicago Landlords
Send the invite. Review the reports. Make the call. Here's how.
Before you start
Step 01
Get to your screening dashboard
Sign in to Domu. Click your profile in the top-right corner and choose Tenant Screening from the dropdown.
This opens your dashboard. The four cards at the top show where every applicant stands at a glance.
Step 02
Start a new request
Click + New Screening Request in the top right. This opens a single form that handles everything: the property, the applicant, and your authorization to pull the report. You'll fill it out top to bottom and submit once.

Step 03
Add the property
You have two paths, depending on whether the unit is already listed on Domu.
If the unit is on Domu, open the Select Property dropdown and pick it. Add a unit number if applicable. Domu pulls the property details automatically.
If the unit isn't on Domu, check the box that says Add property only for Credit report. The form expands so you can enter the property manually: building name, address, unit, rent, fees, and income-to-rent ratio. Make sure Property is active is checked before moving on.
Step 04
Add the applicant and authorize
Scroll down to the Renter Information section in the same form. Enter your applicant's first name, last name, and email — double-check the email, since that's where the invite goes.
Choose how to share the screening link. Send email to renter now lets Domu email them directly. Copy link and send it manually is useful if you'd rather text the link or send it from your own inbox.
Check the TransUnion authorization box and click Create Screening Request.
Step 05
Complete the TransUnion attestations
After you submit, TransUnion returns a short set of property attestations you need to acknowledge before reports can be generated. Answer the questions and submit.
That's the end of your part of the setup.
Step 06
Wait for your applicant
The request is now in your applicant's hands. They'll get the invite, create a Domu account or sign in, enter their info, complete identity verification with TransUnion, and pay the $50. You can check progress anytime from your dashboard.
| Status | What it means |
|---|---|
| Pending | Invite sent, applicant hasn't started yet |
| In Progress | Applicant has started filling out their info |
| IDV Failed | Applicant couldn't pass identity verification online; TransUnion may need to verify them by phone, which can add a day or so |
| Payment Completed / Paid | Applicant paid; reports are being requested |
| Phase 1 Reports Ready | Credit and eviction are ready for your review |
| Phase 2 Reports Ready | Criminal report is ready (only after you've conditionally approved) |
| Approved / Declined | Final decision recorded |
| Cancelled | Request cancelled before completion |
Step 07
Review credit and eviction
Once your applicant finishes their part, you'll get a notification email. Open the request from your dashboard.
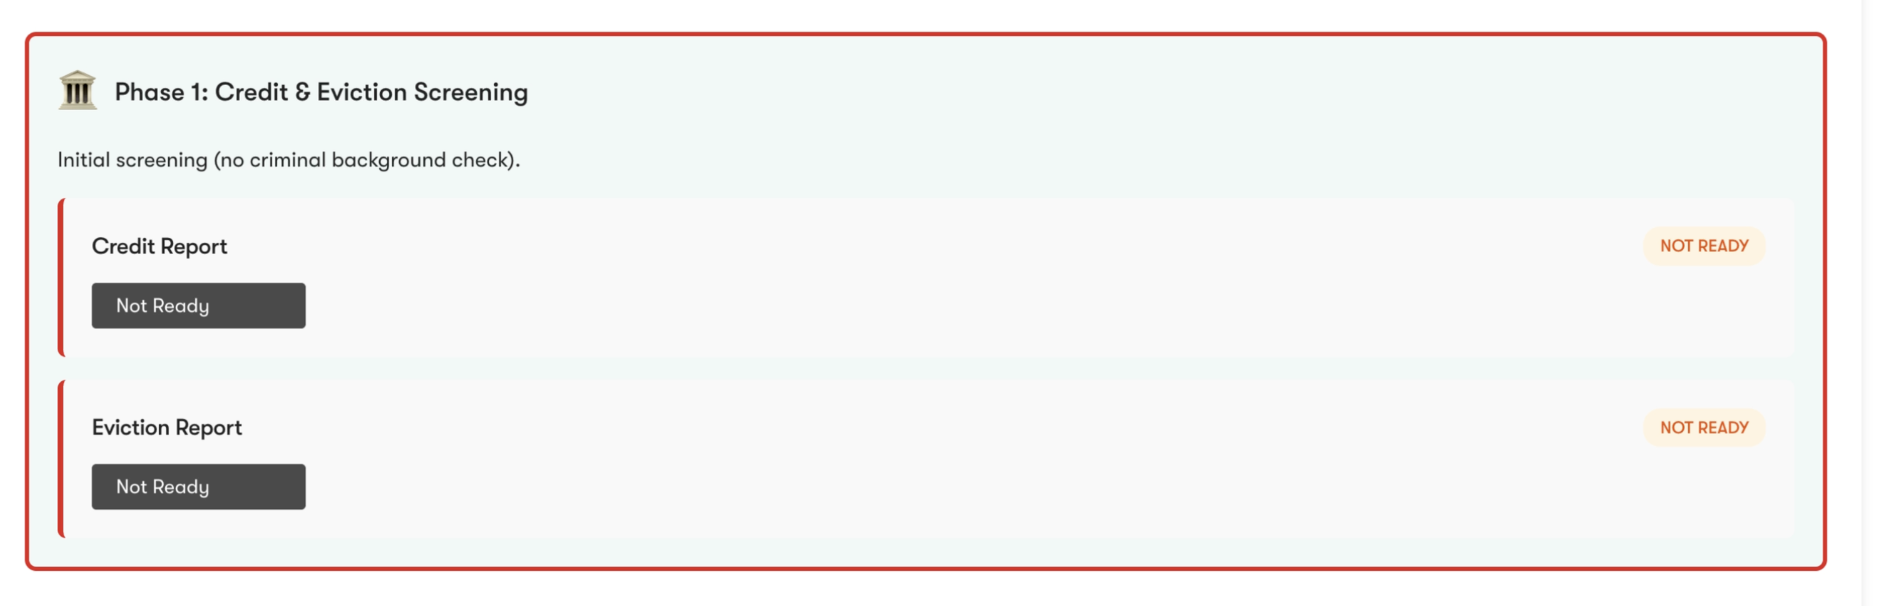
Below the progress bar, the Phase 1: Credit & Eviction Screening section is outlined in red. When the reports are ready, each card shows a green READY pill. Click View Report on each one to review.
If the cards display NOT READY in orange, TransUnion is still processing the report. Most reports are generated within minutes, though some may take a few hours and, in rare cases, up to a few days.
Step 08
Conditionally approve, or deny
This is the Cook County-specific step. If the credit and eviction reports meet your criteria, check the conditional approval box and click Conditionally Approve & Unlock Criminal Report. This is not a final decision: it only moves the application to the next phase by unlocking the criminal background check for review.
If they don't meet your criteria, click Deny Application. The request stops here.
Step 09
Review the criminal background check
Until you've conditionally approved, the Phase 2: Criminal Background Check section shows a LOCKED pill and a disabled card.
Once you conditionally approve, it unlocks. The card updates to READY with a View Report button.

Step 10
Make your final decision
Scroll to the Final Approval Decision block. Check the box confirming you've reviewed everything, then choose Approve Application or Deny Application.
Recording the decision in Domu is optional. You may communicate approval or denial through whatever process you prefer. However, it should be noted that selecting Approve Application or Deny Application within your dashboard will automatically send the applicant an email notifying them of your decision.
FAQs For Landlords
Getting started
Pricing, listings, applicants, and what to gather first.
No. You can screen for any property, listed or not. When you create the request, the Select Property dropdown lists your existing Domu listings. If the unit isn't there, look for Can't find your property? below the dropdown and check Add property only for Credit report to enter the address manually.
Each person pays separately. Every adult on the lease, including every co-leaseholder, cosigner, and guarantor, needs their own screening request and pays their own $50.
Example: a 2-bedroom going to two roommates is two screening invites and $100 total. If one of those roommates also has a parent cosigning, that's a third invite and another $50, for $150 total.
Yes. We recommend a pre-screening application before any paid screening. The standard workflow:
- Show the unit to anyone who's interested. In-person, virtual, or self-guided is up to you.
- Send a Domu tenant screening invite (credit check request) to an applicant. Along with the invite, you can choose to send over our free rental application.
- Review the responses against the criteria you set in advance, like income, move-in date, and rental history
- Approve or deny based on the screening reports. If you deny, send the screening invite to your next qualified applicant.
This protects applicants from paying $50 each before they have a real shot, and it keeps your screening process consistent. Each applicant gets evaluated against the same criteria in the same order.
Our recommendation: send one screening invite at a time. Wait for that applicant's reports before sending the next one.
Applicants pay $50 each. Sending five invites to fill one unit means four people pay $50 for nothing, and applicants notice. The exception is roommates or cosigners on the same lease. Send those simultaneously. See the cosigners question below for how that works.
If you want to thin the field of competing applicants before anyone pays, a short pre-screening application is the right tool.
Income-to-rent ratio is the multiplier you want an applicant's monthly gross income to be compared to monthly rent. The industry standard is 3x (meaning an applicant earning $4,500/month would meet the threshold for a $1,500/month unit).
Domu's screening defaults to 3x if you don't change it.
Reports and Data
What's in each report, where it comes from, and how to read it.
N/A means TransUnion couldn't generate a credit score for that applicant, which is usually because their credit file is too thin. Common reasons:
- They're new to credit (recent grad, young renter, first-time borrower)
- They're new to the U.S. credit system (international students, recent immigrants)
- They've used cash and debit cards exclusively and haven't built a credit history
- Their credit file has been frozen or has insufficient activity in the scoring window
N/A is not a red flag and is not a denial reason on its own. It just means the score is unavailable. Look at the rest of the report (payment history, eviction history, employment, income) and consider asking for additional documentation like bank statements, references from previous landlords, or a cosigner.
No. Applicants enter their stated income and employment status on the screening form. Domu passes that information through to you on the report, but we do not contact employers, request pay stubs, or independently verify the numbers.
Income verification is your job as the landlord. The screening report tells you what the applicant claims. You should still ask for pay stubs, an offer letter, tax returns, voucher paperwork, or whatever documentation you typically use to confirm income before signing a lease.
A fraud indicator on a TransUnion credit report flags a potential discrepancy or alert on the applicant's file. The most common indicators:
- Name mismatch — the name the applicant entered doesn't exactly match the name TransUnion has on file
- Address mismatch — the current address entered doesn't match recent bureau records
- SSN mismatch — the SSN entered doesn't match the rest of the applicant's file
- Prior fraud activity — TransUnion has previously flagged unusual activity on this file
- Fraud victim alert — the applicant proactively asked TransUnion to add an alert because they've been a victim of identity theft
A fraud indicator is information, not a verdict. Some are worth investigating. Others (like a fraud victim alert) mean that the applicant is the victim of identity theft and put the alert on their own file to protect themselves. Declining an applicant solely because they've taken steps to protect their own identity isn't a defensible decision under federal or Illinois fair housing law.
When you see a fraud indicator, ask the applicant about it directly. A name mismatch might be a marriage, divorce, or legal name change. An address mismatch might be a recent move that hasn't propagated to the bureau yet. An SSN mismatch is more serious and warrants documentation. A fraud victim alert usually warrants nothing more than a brief conversation.
If something doesn't add up after you've asked and given the applicant a chance to provide context, factor that into your decision alongside the rest of the report.
TransUnion. They're one of the three major national credit bureaus, and Domu pulls credit, eviction, and criminal background data directly from them.
Coverage: eviction records include Cook County, Illinois statewide, and nationwide court records. Criminal background runs against nationwide databases.
No. Screening reports can only be run on a real applicant who has been invited, has consented through the screening flow, and has paid the $50 fee.
Dashboard Flow and Status Key
Every label, pill, and progress step explained.
You’ll receive an email notification each time a report is ready. On your dashboard, report cards will update from “Not Ready” to a clickable “View Report” link.
Most reports are completed within minutes after the applicant submits payment. However, some may take a few hours, and in rare cases, up to 3 business days.
The four cards at the top of your screening dashboard give you an at-a-glance view of your pipeline:
- Total Invites — every screening request you've ever sent, regardless of status. Your all-time count.
- Pending — invites you've sent that the applicant hasn't opened or started yet. These are waiting on the renter to take action.
- In Progress — applications the renter has started but hasn't finished. Could be mid-profile, mid-identity-verification, or mid-payment.
- Completed — applications where reports are ready (or, for Cook County properties, where you've reached the Final Decision stage).
The numbers update in real time as renters move through the flow.
Each individual invite carries a status that tells you exactly where the applicant is in the flow:
- IDV Completed — the applicant passed identity verification (either the online quiz or manual phone verification). They can now proceed to payment.
- IDV Failed — the applicant didn't pass the online identity verification quiz. They've been directed to call TransUnion support to verify manually. Status will update when they complete (or abandon) manual verification.
- Cancelled — the screening request was cancelled, either by you or because the applicant didn't complete the flow within the allowed window.
The dashboard will hold the application at the "Phase 1 Reports Ready" stage until you take action. Take the time you need to review credit and eviction history carefully.
You have three paths after Phase 1:
- Conditionally approve — you've reviewed credit, income, and eviction history and the applicant qualifies on those grounds. This unlocks the criminal background check (Phase 2). Conditional approval is not a final lease offer; it's a procedural step required by Cook County's Just Housing Ordinance before you can review criminal history.
- Decline based on Phase 1 — if the applicant doesn't qualify on credit, income, or eviction history alone, you can decline at this stage without ever pulling the criminal report. This is the JHO-compliant path when criminal history isn't part of the decision.
- Wait — request more documentation from the applicant (pay stubs, voucher paperwork, references) before moving forward.
Important: recording the final decision in Domu is optional. You may communicate approval or denial through whatever process you prefer. However, it should be noted that clicking "Approve Application" or "Deny Application" on the final decision step will automatically send the applicant an email notifying them of your decision. Don't click either until you're ready to commit. See our full Cook County JHO walkthrough.
The progress bar on each individual screening request shows where things stand. The full Cook County flow has nine stages:
- Request Created — you set up the screening request in your dashboard.
- Invitation Sent — the applicant received the email invite.
- Renter Accepted — the applicant clicked through, logged in (or created an account), and started the application.
- Identity Verification — the applicant passed TransUnion's identity verification (either the online quiz or manual phone verification).
- Payment Received — the applicant paid the $50 fee.
- Phase 1 Reports Ready — credit and eviction reports are available for your review.
- Conditionally Approved — you've reviewed Phase 1 and unlocked the criminal background check.
- Criminal Report Ready — the criminal background check is available.
- Final Decision — you've made your final approve/decline decision.
For non-Cook County properties (rare in Chicago, since most of the city is in Cook County), the flow skips the conditional approval gate: Phase 1 and criminal reports come back together at the "Reports Ready" stage, followed directly by Final Decision.
As a landlord, you'll receive emails at these key points:
- Renter payment completed — sent right after the applicant successfully pays the $50 screening fee. Reports are now being generated.
- Report ready — sent each time a new report becomes available. For Cook County properties, you'll receive separate notifications for Phase 1 (credit and eviction) and Phase 2 (criminal). For non-Cook County properties, all three reports typically arrive in a single notification.
All other status updates (applicant accepted invite, identity verification in progress, etc.) are visible in your dashboard but don't trigger emails — log in to check status if you're waiting on something specific.
Troubleshooting
Failed verifications, applicant errors, and reused screenings.
You can check the screening request status on your dashboard:
- IDV Failed means they didn't pass the online identity quiz and have been directed to call TransUnion support for manual verification. This is real. Manual verification can take a few business days depending on TransUnion's call queue.
- In Progress or Identity Verification (with no failure indicator) means they may not have actually attempted the quiz yet.
- IDV Completed means they passed verification. Any ID issue they raise after this point is about something else.
If the status is IDV Failed and hasn't moved in a week, it's reasonable to check in with the applicant and ask whether they've been able to reach TransUnion.
Yes, you can trust it — within the 30-day reuse window. Here's how it works:
When an applicant has completed a Domu screening within the last 30 days, you can send them a new screening invite for your unit and they don't pay again. The reports you receive are fresh reports pulled against your specific request, not a forwarded PDF of the old ones. TransUnion regenerates the data, Domu timestamps it for your file, and it's tied to your screening request ID.
This means:
- Every report you see has a current Domu timestamp — you're not relying on the applicant's word about when it was pulled.
- If the applicant's situation has changed (new eviction filing, new address, score drop), the new report will reflect it.
- You're protected by the same TransUnion data integrity as a fresh-paid screening.
After the 30-day window closes, the applicant has to pay $50 again for a new screening.
Yes. Cancel the original request from your dashboard and send a new screening invite.
Each screening request locks in the applicant's submitted info, so the only way to fix it is to start fresh. The applicant won't be charged twice as long as the original request hasn't completed payment yet.